Braised Chicken Thighs
Learn how to make restaurant-quality braised chicken thighs at home. Tender, juicy dark meat in a rich, savory sauce with vegetables. Perfect weeknight dinner.
Ingredients
- 6 bone-in skin-on chicken thighs (about 2 pounds)
- 2 teaspoons kosher salt
- 1 teaspoon black pepper
- 2 tablespoons olive oil
- 1 large yellow onion sliced into thick rings
- 4 cloves garlic minced
- 2 medium carrots cut into 2-inch pieces
- 3 celery stalks cut into 2-inch pieces
- 1 cup low-sodium chicken broth
- 1/2 cup dry white wine
- 2 tablespoons tomato paste
- 2 bay leaves
- 1 teaspoon dried thyme
- 1 teaspoon dried rosemary
- 1/4 teaspoon red pepper flakes
- 2 tablespoons fresh lemon juice
- 1 tablespoon cornstarch
- 2 tablespoons cold water
- 2 tablespoons fresh parsley chopped
Instructions
- Preheat your oven to 325°F (165°C). This low, gentle heat is essential for braising—it allows the chicken to cook through evenly without toughening the exterior.
- Remove chicken thighs from the refrigerator 15 minutes before cooking. Pat completely dry with paper towels on both sides. Moisture prevents proper browning and crispy skin. Season generously with 1 teaspoon kosher salt and 1/2 teaspoon black pepper on all sides, including skin and underside. The seasoning should coat the entire surface.
- Place a large Dutch oven (5–6 quart capacity) or heavy-bottomed pot over medium-high heat. Add 2 tablespoons olive oil and let it heat for 1–2 minutes until the oil shimmers and a drop of water immediately sizzles and evaporates. This indicates the oil is hot enough for searing.
- Carefully place 3 chicken thighs skin-side down in the hot oil. They should sizzle immediately. Do not move them for 4–5 minutes—this allows the skin to render, crisp, and turn deep golden brown. You should smell toasted chicken aromas and hear gentle crackling. Do not attempt to turn early; patience is crucial.
- After 4–5 minutes, using kitchen tongs, flip the 3 thighs skin-side up and sear the other side for 2–3 minutes. The underside should show light golden-brown color. Transfer these 3 thighs to a clean plate. Checkpoint: Chicken skin should be deep golden and feel crispy when gently pressed.
- Repeat Step 4–5 with the remaining 3 chicken thighs. Sear skin-side down for 4–5 minutes until golden, flip, and sear the other side for 2–3 minutes. Transfer to the plate with the first batch. Do not crowd the pot—working in batches ensures each thigh gets proper browning.
- Carefully pour off most of the rendered fat from the pot, leaving approximately 1 tablespoon behind. This residual fat carries tremendous flavor. Tilt the pot and use a ladle or spoon to remove excess fat, but leave the browned bits (called fond) stuck to the bottom—these are pure flavor.
- Add 1 large yellow onion (sliced into thick rings about 1/2-inch wide), 4 minced garlic cloves, 2 medium carrots (cut into 2-inch diagonal pieces), and 3 celery stalks (cut into 2-inch pieces) to the pot. Stir constantly with a wooden spoon for 3–4 minutes. The vegetables should soften slightly and the garlic should become fragrant but not brown. You should smell sweet onion and caramelizing garlic aromas.
- Add 2 tablespoons tomato paste directly to the vegetables. Stir thoroughly for exactly 1 minute, coating all vegetables. Tomato paste should darken slightly and become fragrant—this process, called blooming, intensifies its umami flavor. Do not skip this step or rush it.
- Pour 1/2 cup dry white wine into the pot, scraping the bottom with a wooden spoon to release all the caramelized fond stuck to the surface. This fond dissolves into the liquid and becomes part of your sauce. Simmer for 1–2 minutes; the alcohol smell should fade and the liquid should reduce very slightly.
- Add 1 cup low-sodium chicken broth, 2 bay leaves, 1 teaspoon dried thyme, 1 teaspoon dried rosemary, and 1/4 teaspoon red pepper flakes to the pot. Stir to combine. The liquid should have a warm herbal aroma.
- Return all 6 seared chicken thighs to the pot, nestling them skin-side up among the vegetables. The liquid should come about halfway up the sides of the chicken—not fully submerging them. This is braising, not boiling. If liquid seems too shallow (less than 1 inch), add 1/4 cup more broth.
- Bring the liquid to a gentle simmer over medium heat. You should see small, occasional bubbles breaking the surface—about 2–3 per second. Once simmering, immediately cover the pot with its lid (or use parchment paper under the lid to trap more steam).
- Transfer the covered pot to the preheated 325°F oven. Braising in the oven provides even, gentle heat from all sides. Set a timer for 45 minutes.
- At the 45-minute mark, carefully open the lid (watch for steam). The chicken should be fork-tender—a fork should pierce the meat easily with no resistance. The internal temperature at the thickest part should reach 165°F (74°C) using an instant-read thermometer. If not yet fork-tender, return to the oven for 5 more minutes and check again. The sauce should have reduced by about 1/4 and smell rich, savory, and deeply aromatic. Checkpoint: Chicken is ready when completely tender and the sauce coats a spoon.
- Remove the pot from the oven using an oven mitt. Carefully lift off the lid (very hot steam will escape). Let the pot sit on the stovetop for 2 minutes to cool slightly. Remove and discard the bay leaves by fishing them out with a spoon or tongs.
- Stir in 2 tablespoons fresh lemon juice to brighten and balance the richness of the sauce. Taste the sauce by spooning a small amount into a clean spoon and letting it cool briefly. Adjust seasoning with additional kosher salt and black pepper as needed—remember, the chicken has already been salted, so add sparingly.
- Optional thickening: If you prefer a thicker, more sauce-like consistency (rather than a thin, brothy sauce), make a cornstarch slurry by whisking 1 tablespoon cornstarch with 2 tablespoons cold water until completely smooth. Stir this slurry into the simmering sauce and cook for 1–2 minutes, stirring constantly, until the sauce thickens and becomes glossy. You should see the sauce coat the back of a spoon. If you prefer the thinner broth as-is, skip this step.
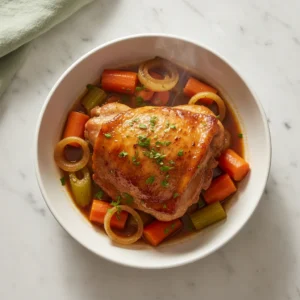
- Ladle the braised chicken thighs and vegetables into shallow bowls or onto dinner plates. Spoon the warm sauce over each serving. Garnish each plate with approximately 1/2 teaspoon of fresh chopped parsley for color and fresh flavor. Serve immediately while hot.