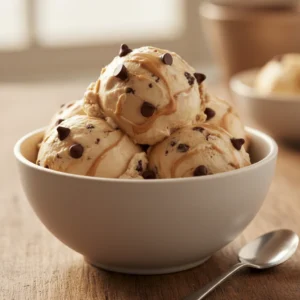
Cottage Cheese Ice Cream
Make creamy cottage cheese ice cream at home with no ice cream maker. High-protein, delicious frozen dessert ready in 4 hours with peanut butter and chocolate chips.
Ingredients
- 16 oz 2 cups 4% milkfat small-curd cottage cheese
- 3 tbsp pure maple syrup or raw honey
- 1 tsp pure vanilla extract
- ¼ cup creamy all-natural peanut butter adds fats to prevent iciness
- ⅓ cup mini dark chocolate chips
Instructions
- Prepare your blender: Gather your high-speed blender or food processor. This step takes 2 minutes and ensures you have everything ready before beginning.
- Add base ingredients to blender: Pour the 16 oz (2 cups) 4% milkfat small-curd cottage cheese directly into the blender bowl. Add 3 tbsp pure maple syrup or raw honey, 1 tsp pure vanilla extract, and ¼ cup creamy all-natural peanut butter. Do not blend yet. This takes 3 minutes of prep time.
- Blend on high speed: Secure the blender lid tightly. Turn to high speed and blend for 60–90 seconds total. Stop halfway through (around 45 seconds) and carefully remove the lid. Use a rubber spatula to scrape down the sides of the blender, pushing any visible cottage cheese curds back into the center. Replace the lid and continue blending for the remaining 15–45 seconds until the mixture is completely smooth, shiny, and creamy with absolutely no visible cheese curds or lumps. You should see a glossy, uniform texture resembling soft-serve ice cream base. Checkpoint: The mixture is ready when it looks like silky pudding with no grainy or chunky spots.
- Prepare the fold-in bowl: While the base is blending, take a medium-sized mixing bowl (ceramic or glass works best) and have it ready on your counter. This takes 1 minute.
- Transfer blended mixture to bowl: Carefully pour the entire smooth cottage cheese mixture from the blender into your prepared bowl. Use a spatula to get every last bit out of the blender. This takes 2 minutes.
- Fold in chocolate chips: Sprinkle ⅓ cup mini dark chocolate chips over the top of the mixture. Using a rubber spatula or wooden spoon, gently fold the chips into the mixture using a gentle under-and-over motion (not stirring). Fold for 10–15 seconds until the chocolate chips are evenly distributed throughout and no dry chips remain visible on the surface. Checkpoint: You should see chocolate specks distributed throughout the cream base.
- Prepare your freezing pan: Take a 9×5-inch metal loaf pan or shallow rectangular container and place it on a flat section of your freezer shelf. Metal pans freeze faster and more evenly than plastic. This takes 1 minute.
- Transfer mixture to freezing pan: Pour the chocolate-chip-studded mixture into the prepared pan. Using an offset spatula or the back of a spoon, spread it into an even, level layer, roughly ½ to ¾ inch thick. Try to avoid air pockets. This takes 3 minutes.
- Cover tightly: Cut a piece of plastic wrap slightly larger than your pan (about 10×8 inches). Press it directly onto the surface of the ice cream mixture, smoothing out any air bubbles. This direct contact prevents ice crystals from forming on the surface. Wrap any excess plastic wrap around the sides of the pan, sealing it completely. This takes 2 minutes.
- Freeze for 3 hours: Place the covered pan in the coldest part of your freezer (usually the back or bottom shelf) where it won't be disturbed. Set a timer for 3 hours. During this time, the mixture will gradually firm up and transform from liquid-like to scoopable. This takes 180 minutes (3 hours) of passive freezing time.
- Check texture at 3-hour mark: After exactly 3 hours, remove the pan from the freezer and gently press the plastic wrap with your fingertip. The mixture should feel firm but yield slightly to gentle pressure—like soft-serve ice cream or very thick pudding. If it still feels too soft or liquid-like, return to freezer for another 30 minutes and check again. Checkpoint: The ice cream is ready to serve when you can press a spoon into it and it holds the shape but isn't rock-hard.
- Scoop and serve immediately (if freezing 3–4 hours total): Using a sturdy ice cream scoop dipped in warm water (to help scooping), dig into the ice cream and portion into bowls or cones. The soft-serve consistency means you may need to scoop quickly before it melts. Serve immediately. This takes 5 minutes. Checkpoint: Your scoops should look creamy and hold their shape for 2–3 minutes at room temperature.
- If freezing longer than 4 hours or overnight: Cover tightly with plastic wrap as described above. Freeze for up to 7 days. When ready to serve, remove the pan from the freezer and place it undisturbed on your kitchen counter for exactly 15 minutes. Do not open the freezer or move the pan during this time. The gentle warming softens the ice cream to a scoopable consistency. After 15 minutes, scoop and serve immediately. This takes 15 minutes of passive thawing time.
- Troubleshooting checkpoint: If the ice cream is too hard to scoop even after the 15-minute thaw, let it sit for an additional 5 minutes. If it remains rock-hard, your freezer may be extremely cold; increase thaw time to 20 minutes next time.