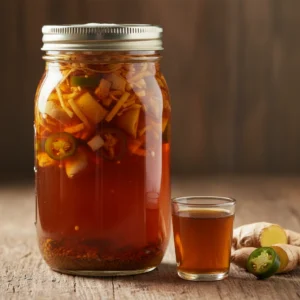
Fire Cider Recipe
Make fire cider at home with this easy step-by-step recipe. Learn how to ferment spicy roots, garlic, and raw vinegar for natural immune support.
Ingredients
- ½ cup fresh horseradish root peeled and grated (or finely chopped)
- ½ cup fresh ginger root peeled and grated
- 1 medium onion roughly chopped
- 10 cloves garlic crushed or roughly chopped
- 2 jalapeño peppers sliced (leave seeds in for more heat)
- 1 lemon quartered (leave peel on)
- 2 tbsp fresh turmeric root grated (or 1 tbsp ground turmeric)
- 1 tsp whole black peppercorns
- Raw Apple Cider Vinegar must say "with the mother" on the bottle, approx. 2-3 cups
- ¼ cup raw honey added at the very end, adjust to taste
Instructions
- Prep your ingredients: Peel and grate the horseradish root (2–3 minutes). Peel and grate the ginger root (2–3 minutes). Work in a ventilated area—horseradish and ginger fumes are intense. Roughly chop the onion (1 minute). Crush or roughly chop the 10 garlic cloves (1 minute). Slice the jalapeños with seeds (1 minute). Quarter the lemon, leaving peel on (1 minute). Grate or measure the turmeric (1 minute). Have the black peppercorns ready. Checkpoint: All ingredients should be prepped and ready to layer into the jar.
- Sterilize your jar: Wash a clean 1-quart (32 oz) glass mason jar with hot soapy water and rinse thoroughly (2–3 minutes). Dry with a clean towel. A sterile jar prevents unwanted mold or bacteria during fermentation. Checkpoint: Your jar is clean, dry, and ready to fill.
- Layer the solids loosely: Add the grated horseradish, ginger, chopped onion, crushed garlic, sliced jalapeños, lemon quarters, grated turmeric, and black peppercorns into the jar (2 minutes). Keep ingredients loose and chunky—do not pack them down. The jar should be approximately 2/3 full of solids. Checkpoint: Solids fill the jar to about the 2/3 mark, leaving room for vinegar.
- Pour in the vinegar: Slowly pour raw apple cider vinegar (with the mother) over the ingredients until they are completely submerged (2–3 minutes). Fill the jar all the way to the top, ensuring there is at least 1 inch of vinegar covering the highest piece of vegetable or root. The vinegar extracts and preserves the medicinal compounds during fermentation. Checkpoint: All solids are fully submerged under at least 1 inch of vinegar.
- Protect the metal lid: Cut a small piece of parchment paper or wax paper and place it flat over the jar opening, just under the rim (1 minute). This barrier prevents the acidic vinegar from corroding the metal lid during the 3–4 week steep. Screw the metal lid on firmly over the parchment. Checkpoint: The parchment is in place and the lid is sealed tight.
- Store in a cool, dark place: Place the sealed jar in a cool, dark cabinet, cupboard, or pantry (away from direct sunlight and heat) for 3 to 4 weeks. A kitchen cabinet or a basement shelf works perfectly. Temperature stability matters—avoid placing it near the oven or a sunny window. Checkpoint: Your jar is stored safely in a consistent, cool environment.
- Shake daily: Once per day (or whenever you remember), remove the jar and shake it gently for 10–15 seconds (30 seconds total time including retrieval). Shaking helps distribute flavors evenly and encourages the infusion process. You may notice the color deepening to amber or rust tones as days pass—this is normal and expected. Checkpoint: You have established a daily shaking routine; the jar is darkening in color.
- Check readiness after 3 weeks: Around day 21, open the jar and taste a tiny sip (never touching your mouth directly to avoid contamination). The liquid should taste powerfully spicy, tangy, and aromatic. If it's not strong enough, seal and continue for another week. Most batches are ready by day 28. Checkpoint: The liquid tastes bold and fully infused.
- Strain the solids: After 3–4 weeks, set a fine-mesh sieve or several layers of cheesecloth over a clean glass bowl (1 minute). Carefully pour the entire jar contents into the sieve, allowing the liquid to drain naturally (2–3 minutes). Do not rush this step. Checkpoint: Most liquid has drained into the bowl.
- Press the solids hard: Using the back of a spoon or your clean hands, press down firmly on the solids in the sieve to extract every drop of liquid (2–3 minutes). You want to wring out the maximum flavor and medicinal compounds. The solids can be composted or discarded. Checkpoint: The pressed solids are nearly dry and all liquid has been extracted.
- Measure the strained liquid: Pour the strained liquid into a measuring cup to see how much you have (usually 2–2.5 cups). This helps you gauge how much honey to add. Checkpoint: You know the total volume of your fire cider base.
- Add and dissolve the honey: Pour the strained liquid back into a clean bowl. Add ¼ cup raw honey to the liquid (2 minutes). Using a clean whisk or spoon, stir vigorously for 30–60 seconds until the honey is fully dissolved and no visible particles remain. The honey sweetens, preserves, and adds its own soothing antimicrobial properties. Taste it now—if you prefer more or less sweetness, adjust by adding a bit more honey or vinegar. Checkpoint: Honey is completely dissolved; liquid is smooth and evenly sweetened.
- Transfer to storage bottles: Pour the finished fire cider into a clean glass jar or bottle with a tight-fitting lid (3 minutes). Avoid plastic if possible, as vinegar may degrade some plastics over time. Glass is ideal. Checkpoint: Fire cider is in its final storage container, sealed and ready.
- Refrigerate: Place the sealed jar in the refrigerator immediately. Refrigeration slows any remaining fermentation and keeps the fire cider fresh and potent for up to 6 months. Do not leave it at room temperature—cold storage is essential for longevity. Checkpoint: Your finished fire cider is cold and ready to use.
- First dose (optional): On day 1 of storage, you may take your first wellness shot: measure 1–2 tablespoons into a small cup or shot glass (1 minute). Drink it straight, or follow with a glass of water if the intensity is overwhelming. Some people prefer to mix it into warm tea or a salad dressing. Take 1–2 tablespoons daily as desired. Checkpoint: You have successfully completed your first batch of fire cider and know how to dose it.