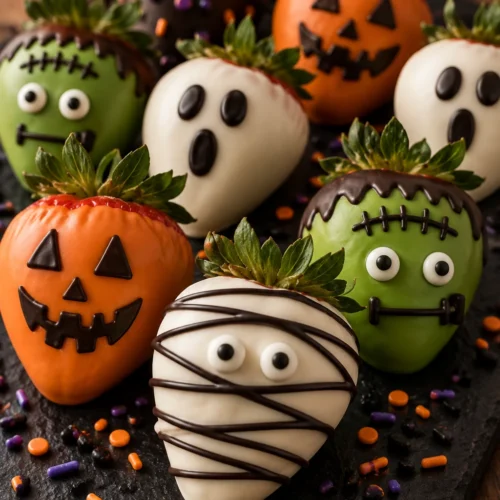
Halloween Chocolate Covered Strawberries
Make Halloween chocolate covered strawberries with 5 spooky designs — mummies, ghosts, pumpkins & more. Easy no-bake recipe with step-by-step tips.
Ingredients
- 1 lb approx. 20–24 medium-large berries Fresh strawberries (large, with stems) (Must be fully dry and room temp before dipping)
- 8 oz White chocolate chips, bar, or candy melts (Base coat for mummies, ghosts, pumpkins, Frankenstein)
- 1 –2 oz Dark or black candy melts Used for spider webs, faces, and detail piping
- 24 –48 pieces Candy eyes Pressed in while chocolate is still wet
- 1 sheet Parchment or wax paper Prevents sticking during setting
- few drops per color Oil-based food coloring orange, green, purple, black, red (Must be oil-based; liquid coloring causes chocolate to seize)
- 1 tsp Coconut oil or vegetable oil Thins chocolate for smooth dipping consistency
- 2 –3 oz Orange candy melts For pumpkin design; can substitute white choc + orange coloring
- 2 –3 oz Green candy melts For Frankenstein design
- 2 –3 tbsp Halloween sprinkles Add while chocolate is still wet
- 1 tube Black writing gel or gel pen For drawing faces after chocolate sets
Instructions
- Rinse all strawberries under cold water, then pat each one completely dry with paper towels — every drop of moisture must be removed. Lay them on a clean dry towel and let them air-dry at room temperature for at least 30 minutes. Checkpoint: You are ready to move on when the berries show zero surface moisture and feel completely dry to the touch.
- Line a large baking sheet with parchment or wax paper and set it near your workspace. Prepare 2–3 small zip-lock bags or piping bags for detail work by snipping a tiny corner off each one when ready to use.
- Place 8 oz of white chocolate and 1 tsp of coconut oil in a microwave-safe bowl. Microwave on half-power in 20-second bursts, stirring thoroughly between each interval. Repeat until the chocolate is fully melted, glossy, and smooth — about 60–90 seconds total. Do not overheat. Checkpoint: You are ready to move on when the chocolate flows off a spoon in a smooth, steady ribbon with no lumps and reaches about 110°F.
- If making multiple designs, divide the melted white chocolate into separate small bowls — one for each color. Add a few drops of oil-based food coloring to each bowl and stir until the color is completely even, about 2–3 minutes. Melt orange and green candy melts separately using the same microwave method if using them for pumpkin or Frankenstein designs.
- Hold one strawberry firmly by its green stem or leaves. Submerge it nearly to the top in your chosen color of chocolate. Rotate the berry gently to coat all sides evenly, then lift it and hold it above the bowl for 3–5 seconds to let the excess chocolate drip off. Checkpoint: You are ready to move on when the berry is coated with a smooth, even shell and no large drips are forming at the base.
- Place the dipped berry immediately onto the parchment-lined tray. While the chocolate is still wet (work quickly, one berry at a time), press 1–2 candy eyes firmly into the surface or sprinkle Halloween sprinkles over the top so they adhere. Repeat for all berries.
- Allow all base-coated berries to set at room temperature for 10–15 minutes. Do not refrigerate. Checkpoint: You are ready to move on when the chocolate shell feels completely hard and matte to the touch and does not leave a fingerprint when lightly pressed.
- Melt 1–2 oz of dark or black candy melts in a small bowl using the same 20-second microwave burst method. Transfer to a piping bag or zip-lock bag with a tiny corner snipped. Pipe your detail designs over the set base coats: horizontal bandage lines for mummies, swirling spider webs, dot-and-line ghost faces, or triangular pumpkin features. Take your time — fine, steady lines look the most impressive.
- Let all detail piping set at room temperature for another 5–10 minutes. Once fully firm, use black writing gel to add any final facial expressions or fine details if desired. Serve immediately or store loosely covered with plastic wrap on the parchment tray at room temperature for up to 12–24 hours.