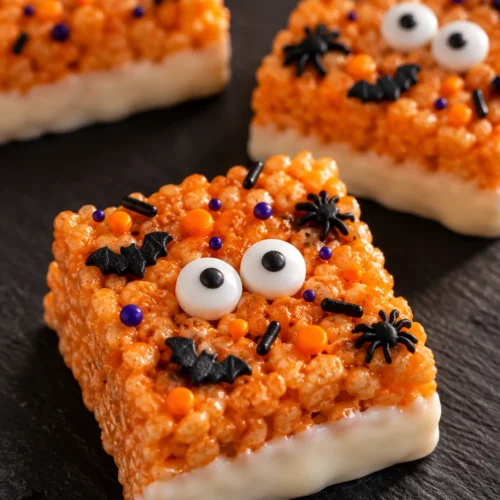
Halloween Rice Krispie Treats
Make the best Halloween Rice Krispie Treats with vibrant orange color, spooky sprinkles, and a candy melt coating. Easy no-bake recipe ready in under an hour.
Ingredients
- 6 cups Rice Krispies cereal Fresh box essential; stale cereal yields tough texture
- 10 oz about 5.5 cups Mini marshmallows (Must be fresh; mini melt more evenly than large)
- 4 –6 tablespoons Unsalted butter Real butter only, not margarine; more butter = gooier result
- few drops to desired shade Orange gel food coloring Gel preferred over liquid; add to marshmallow before cereal
- 1/2 –1 teaspoon Vanilla extract Added off-heat; elevates flavor significantly
- 1/4 –1 teaspoon Salt kosher or fine (Balances sweetness; add with vanilla off heat)
- 2 –3 tablespoons Halloween sprinkles Press on top before set; spiders/pumpkins/bats shapes
- as needed Candy eyes edible (Press into chocolate coating or directly onto treat)
- 1 –1.25 cups White or colored candy melts / chocolate chips For dipping/coating; add 1/2 tbsp coconut oil to thin
- 1/2 tablespoon Coconut oil Mixed with candy melts/chocolate to ease dipping
Instructions
- Line a 9x13-inch baking pan with parchment paper, pressing it flat into the corners. Lightly spray the parchment and sides of the pan with nonstick cooking spray. Set aside. This takes about 2 minutes. Checkpoint: You are ready to move on when the parchment lies flat with no gaps and the pan feels slick to the touch.
- Place a large saucepan or pot on the stove over low to medium-low heat. Add 6 tablespoons of unsalted butter. Stir occasionally and let it melt for 2–3 minutes. Do not turn up the heat — keep it low. Checkpoint: You are ready to move on when the butter is fully liquid with no solid chunks and is just beginning to foam at the edges.
- Add the full 10 oz (about 5.5 cups) of fresh mini marshmallows to the melted butter. Stir constantly with a wooden spoon or silicone spatula. Keep heat on low to medium-low. This takes 3–5 minutes. Checkpoint: You are ready to move on when the mixture is glossy, smooth, and stretchy with absolutely no lumps remaining.
- Remove the pot completely from the heat. Add 1/2 teaspoon vanilla extract, 1/4 teaspoon salt, and several drops of orange gel food coloring. Stir for about 1 minute until the color is deep and uniform. Make the color slightly darker than you want — it will lighten once cereal is added. Checkpoint: You are ready to move on when the mixture is a deep, vibrant orange throughout.
- Add all 6 cups of Rice Krispies cereal to the pot. Using a greased rubber spatula (spray it with nonstick spray), fold and stir quickly for 1–2 minutes. Work fast before the mixture cools and becomes harder to stir. Checkpoint: You are ready to move on when every single piece of cereal is coated in orange marshmallow with no dry white pieces visible.
- Scrape the mixture into your prepared pan. Spray your hands with nonstick spray and gently spread the mixture into an even layer. Use a light touch — press softly, not firmly. This takes about 2 minutes. Checkpoint: You are ready to move on when the surface looks level and feels slightly springy, not dense or compressed.
- While the surface is still warm and tacky, immediately press your Halloween sprinkles and candy eyes into the top. Do this within 1–2 minutes of spreading — if the treats cool too much, the decorations won't stick. Checkpoint: You are ready to move on when the decorations feel embedded and don't slide or fall off.
- Leave the pan on the counter at room temperature. Do not refrigerate at this stage — cold air makes the bars rubbery and tough. Wait 30–60 minutes. If your kitchen is warm, it may take the full 60 minutes. Checkpoint: You are ready to move on when the treats are firm to the touch and no longer feel sticky.
- Lift the entire slab out of the pan using the parchment paper as handles. Place on a cutting board. Cut into rectangles with a sharp knife, or press Halloween cookie cutters (ghosts, pumpkins, bats) into the slab for shaped treats. This takes about 5 minutes. Checkpoint: You are ready to move on when cuts are clean and shapes hold their edges without crumbling.
- (Optional) Place 1 cup of white or colored candy melts and 1/2 tablespoon of coconut oil in a microwave-safe bowl. Microwave in 15–30 second bursts, stirring between each, for a total of about 2–3 minutes, until completely smooth and fluid. The chocolate should be around 90°F and flow off a spoon in a thin ribbon. Dip one side or one end of each treat into the chocolate for 1 minute, letting excess drip off.
- While the chocolate coating is still wet, press on additional candy eyes, sprinkles, or pipe black icing for jack-o-lantern faces or spiderweb designs. Lay each treat on a parchment-lined baking sheet. Allow to set at room temperature for 15–30 minutes, or refrigerate for 10 minutes to speed up setting. Checkpoint: You are ready to serve when the chocolate coating is matte and completely firm and decorations do not move.